Saturday, July 31, 2010
Wednesday, July 28, 2010
Monday, July 26, 2010
Saturday, July 24, 2010
Wednesday, July 21, 2010
Monday, July 19, 2010
Saturday, July 17, 2010
Friday, July 16, 2010
Wednesday, July 14, 2010
Monday, July 12, 2010
Saturday, July 10, 2010
Thursday, July 8, 2010
Watermarking photos using GIMP - now much easier
Few months back I wrote about a custom GIMP Script I use for watermarking the photos. In that post I briefly mentioned about another script which can watermark files in a specified directory. Thanks my friend Yogi's interest in the scripts, I made some modifications and now we have a slightly better script in which all the parameters can be changed from a window.
Follow these instructions to install the new script.
- Download GIMP from http://gimp.org install it.
- Download the script EasyWM.scm
- Save the script in the script folder of gimp installation. In GIMP select Edit->Preferences. In the preferences window expand the "Folders" in the left pane and select Scripts. You will be able find the scripts directories listed in the right pane. Make sure that the file is saved with the extension .scm.
- Restart GIMP.
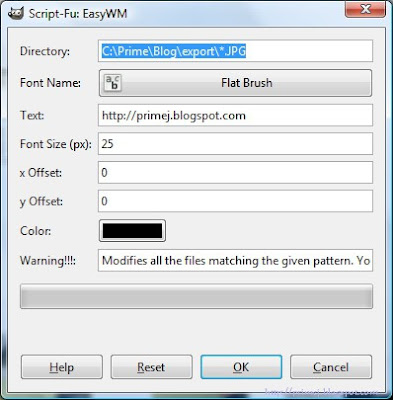
- Open an image using GIMP and the menu EasyWM be visible. Select the sub-menu item EasyWM and the following screen will pop up.
 Change the directory, font, font size and text and the text color to suite your needs and press OK. The script will modify all the JPG files in the specified directory.
 Caution : The script will modify the files in the specified directory and this operation is irreversible. I would strongly advice to use a separate directory and *copy* images to this directory to run this script.
The script will try to position the text based on the font size and text length. However the x offset and y offset can be used to fine tune the position of the text. The offset can be positive or negative values.
The default values in the above screen are set in the following section of the code and you can change them to suit your needs.
SF-FONT "Font Name" "Flat Brush"
SF-STRING "Text" "http://primej.blogspot.com"
SF-VALUE "Font Size (px)" "25"
SF-VALUE "x Offset" "0"
SF-VALUE "y Offset" "0"
SF-COLOR "Color" "#000000"
If you do not see the new menu item, make sure that the script is saved to the correct directory and with the extension .scm
In Linux the file names are case sensitive and the JPG part should match that of the files being modified.
The EasyWM sub menu will not be enabled if no images are opened in GIMP. Either open a image or refresh the scripts by selecting the "Filters->Script-Fu->Refresh Scripts" option.
In Linux the file names are case sensitive and the JPG part should match that of the files being modified.
The EasyWM sub menu will not be enabled if no images are opened in GIMP. Either open a image or refresh the scripts by selecting the "Filters->Script-Fu->Refresh Scripts" option.
Wednesday, July 7, 2010
Monday, July 5, 2010
Saturday, July 3, 2010
Subscribe to:
Comments (Atom)
Creative Commons Attribution-ShareAlike 3.0 Unported (CC BY-SA 3.0) License
The images and photographs posted in this blog by Prime Jyothi are licensed under a Creative Commons Attribution-ShareAlike 3.0 Unported (CC BY-SA 3.0) License.


